Updates could go wrong, upgrades could go wrong, own experiments could go wrong, any given thing could go wrong … and the Fairphone 2 doesn’t boot anymore, doesn’t update anymore, doesn’t do any given important thing anymore.
Updates können schief gehen, Upgrades können schief gehen, eigene Experimente können schief gehen, irgendetwas anderes kann schief gehen … und das Fairphone 2 bootet nicht mehr, updatet sich nicht mehr, oder tut irgendetwas anderes wichtiges nicht mehr.
If even a factory reset or the #fairphoneangels can’t help, then the Fairphone 2 can be wiped completely and installed from scratch.
Neither the factory reset nor updates or upgrades will go this far, and thus awkward faults can be left on the OS’s side.
Wenn auch ein Factory Reset oder die #fairphoneangels nicht helfen können, dann kann man das Fairphone 2 komplett löschen und neu installieren.
So weit gehen weder der Factory Reset noch Updates oder Upgrades, und dadurch können auf Betriebssystemseite immer noch hinderliche Fehler zurück bleiben.
The following is a way to a complete, fresh start as replicable as possible, without claiming to use the least possible keystrokes for enthusiasts or to leave cleaned up directories at the end, but this is a wiki, it can always be edited for improvement ![]() …
…
Hier ist ein möglichst nachvollziehbarer Weg zum kompletten Neuanfang beschrieben, ohne Anspruch auf die geringstmögliche Menge an Tastendrücken für Profis oder auf aufgeräumte Verzeichnisse am Ende, aber das hier ist ein Wiki, Verbesserungen können gern vorgenommen werden ![]() …
…
Attention! This will delete all data. Either a backup of the user data should exist, or it should be made sure that every important data was correctly synced to the internet (e.g. Google), or setting up the phone from scratch without a backup should be a viable option.
(Example backup options: Backing up with TWRP + copying via USB (for user data not backed up by TWRP) … or backing up with Google)
Achtung! Es werden alle Daten gelöscht. Entweder sollte ein Backup der Benutzerdaten vorliegen, oder man sollte sich sicher sein, dass alle wichtigen Daten korrekt ins Internet gesynct wurden (z.B. zu Google), oder man sollte sich sicher sein, dass man das Gerät auch ohne Backup wieder neu einrichten kann.
(Beispiele für Backups: Backup mit TWRP + Kopieren über USB (für Benutzerdaten, die TWRP nicht mitsichert) … oder Backup mit Google)
1. Boot the Fairphone 2 into fastboot mode / Fairphone 2 in den Fastboot-Modus booten
- Turn off the Fairphone 2 / Fairphone 2 ausschalten
- Connect the Fairphone 2 to the computer of choice via USB / Fairphone 2 per USB mit dem Computer der Wahl verbinden
- Turn on the Fairphone 2 with the Volume- key pressed until the Fairphone logo shows up … that’s the fastboot mode (aka “bootloader”) / Fairphone 2 mit gedrückter Leiser-Taste einschalten, Leiser-Taste dabei gedrückt halten, bis das Fairphone-Logo erscheint … das ist der Fastboot-Modus (oder auch “Bootloader” genannt)
2. Get the fastboot command to work / Fastboot-Kommando lauffähig machen
- Download the Android SDK Platform Tools / Android SDK Platform Tools herunterladen
- Extract the downloaded ZIP file to somewhere you can find it / Das heruntergeladene ZIP-Archiv auf dem Computer irgendwohin entpacken, wo man es wiederfindet
- Open a Windows command prompt (cmd) or a Linux/MacOS shell and change into the platform-tools directory, which got extracted from the archive / Windows Eingabeaufforderung (cmd) oder Linux/MacOS Shell öffnen und in das Verzeichnis platform-tools wechseln, das aus dem Archiv entpackt wurde
- On the computer the
fastboot devicescommand should now give a line with an ID and “fastboot” (in case of Linux perhaps as root or using sudo) / Jetzt sollte auf dem Computer das Kommandofastboot deviceseine Zeile mit einer ID und “fastboot” ausgeben (bei Linux evtl. als root oder mit sudo),
Windows for example / Beispiel Windows …

3. Install the current TWRP recovery on the Fairphone 2 / Aktuelle TWRP-Recovery auf dem Fairphone 2 installieren
- Download the current TWRP image … Download TWRP for FP2 … preferrably into the platform-tools directory from before / Aktuelles TWRP-Image herunterladen … Download TWRP for FP2 … einfacherweise in das Verzeichnis platform-tools von eben
-
fastboot flash recovery filename(substitute filename with the filename of the downloaded file) /fastboot flash recovery dateiname(für dateiname den Dateinamen der heruntergeladenen Datei einsetzen)
Windows for example / Beispiel Windows:

- Immediately boot the Fairphone 2 into the newly installed recovery (important to not let a boot attempt of a possibly installed OS overwrite the new recovery with an old one again) / Fairphone 2 gleich in die neu installierte Recovery rebooten (wichtig, damit ein Bootvorgang eines evtl. installierten OS die neue Recovery nicht gleich wieder mit einer alten überschreibt)
- Keep the Volume+ key of the Fairphone 2 pressed / Lauter-Taste des Fairphone 2 gedrückt halten
- On the computer:
fastboot reboot(with the key still pressed) / Auf dem Computer:fastboot reboot(bei gedrückter Taste)
4. Completely wipe the Fairphone 2 with TWRP / Fairphone 2 komplett löschen mit TWRP

- Wipe
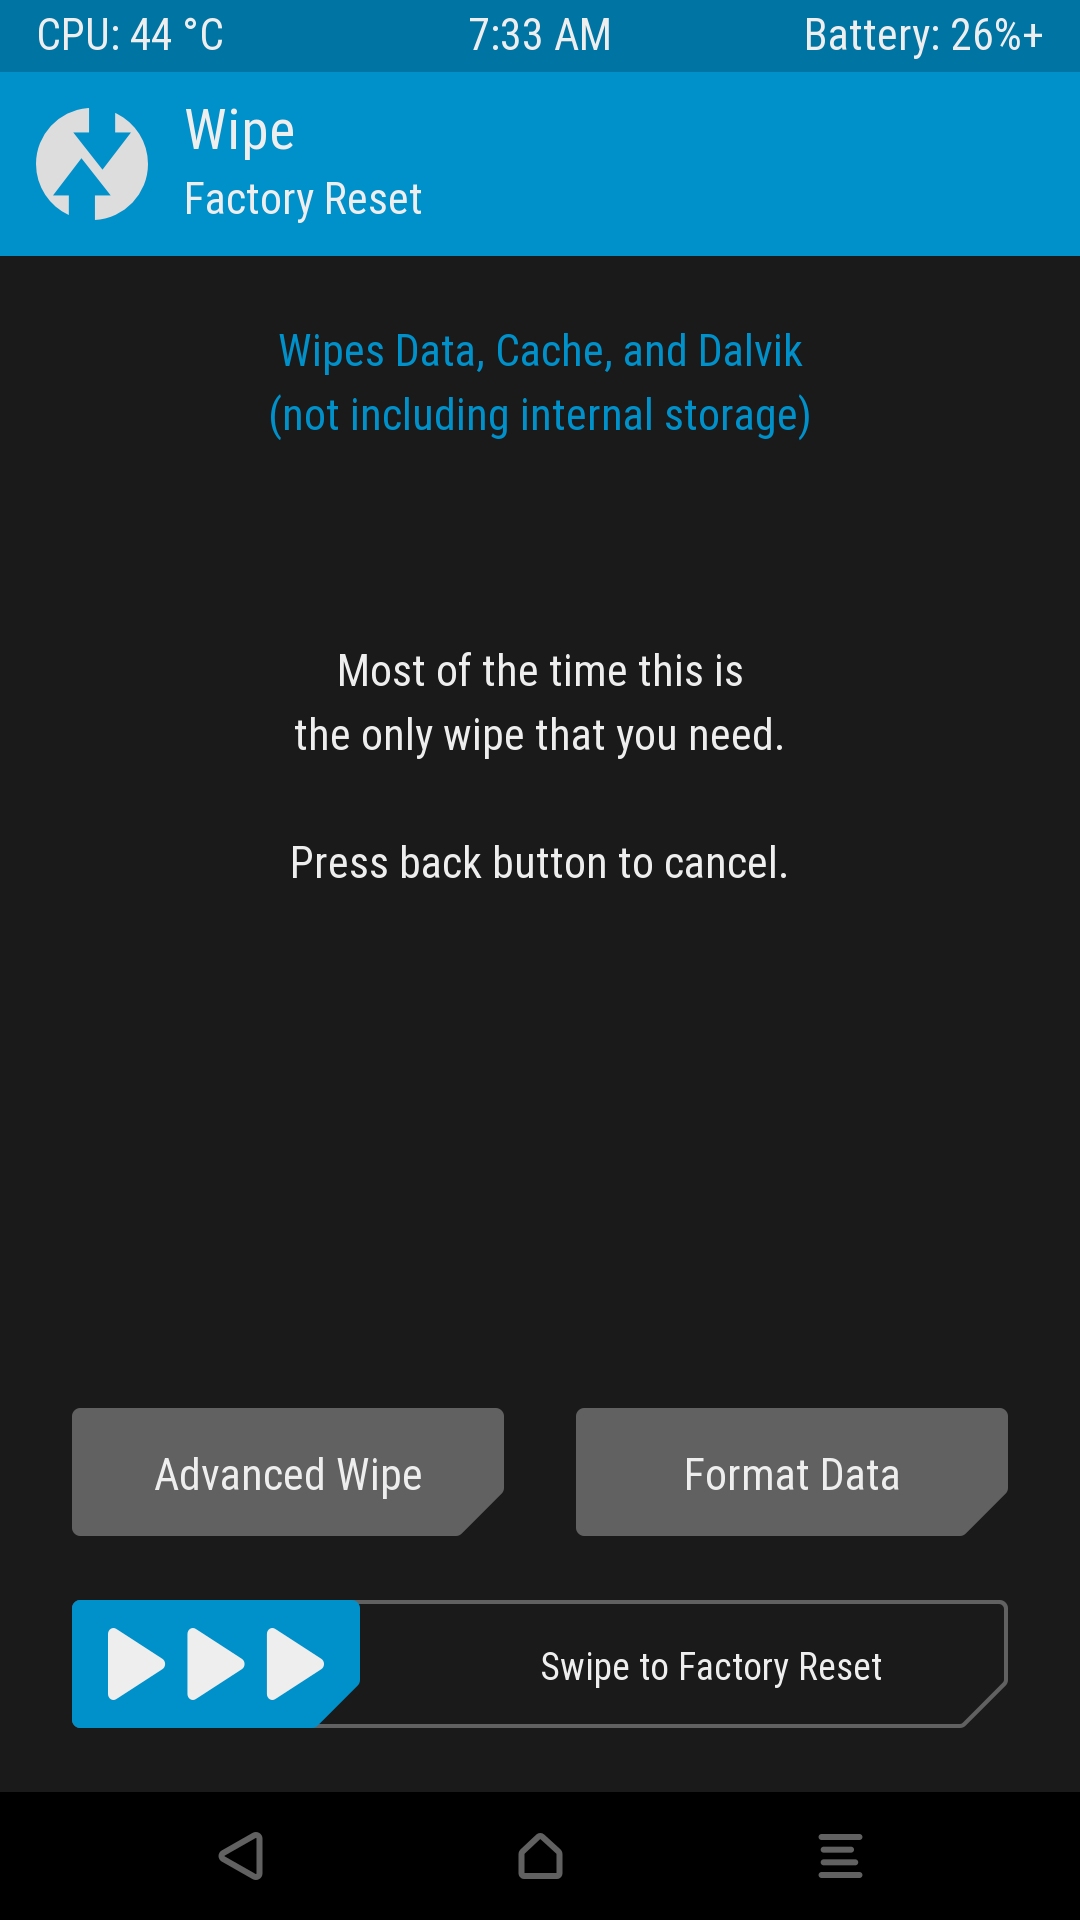
- Advanced Wipe
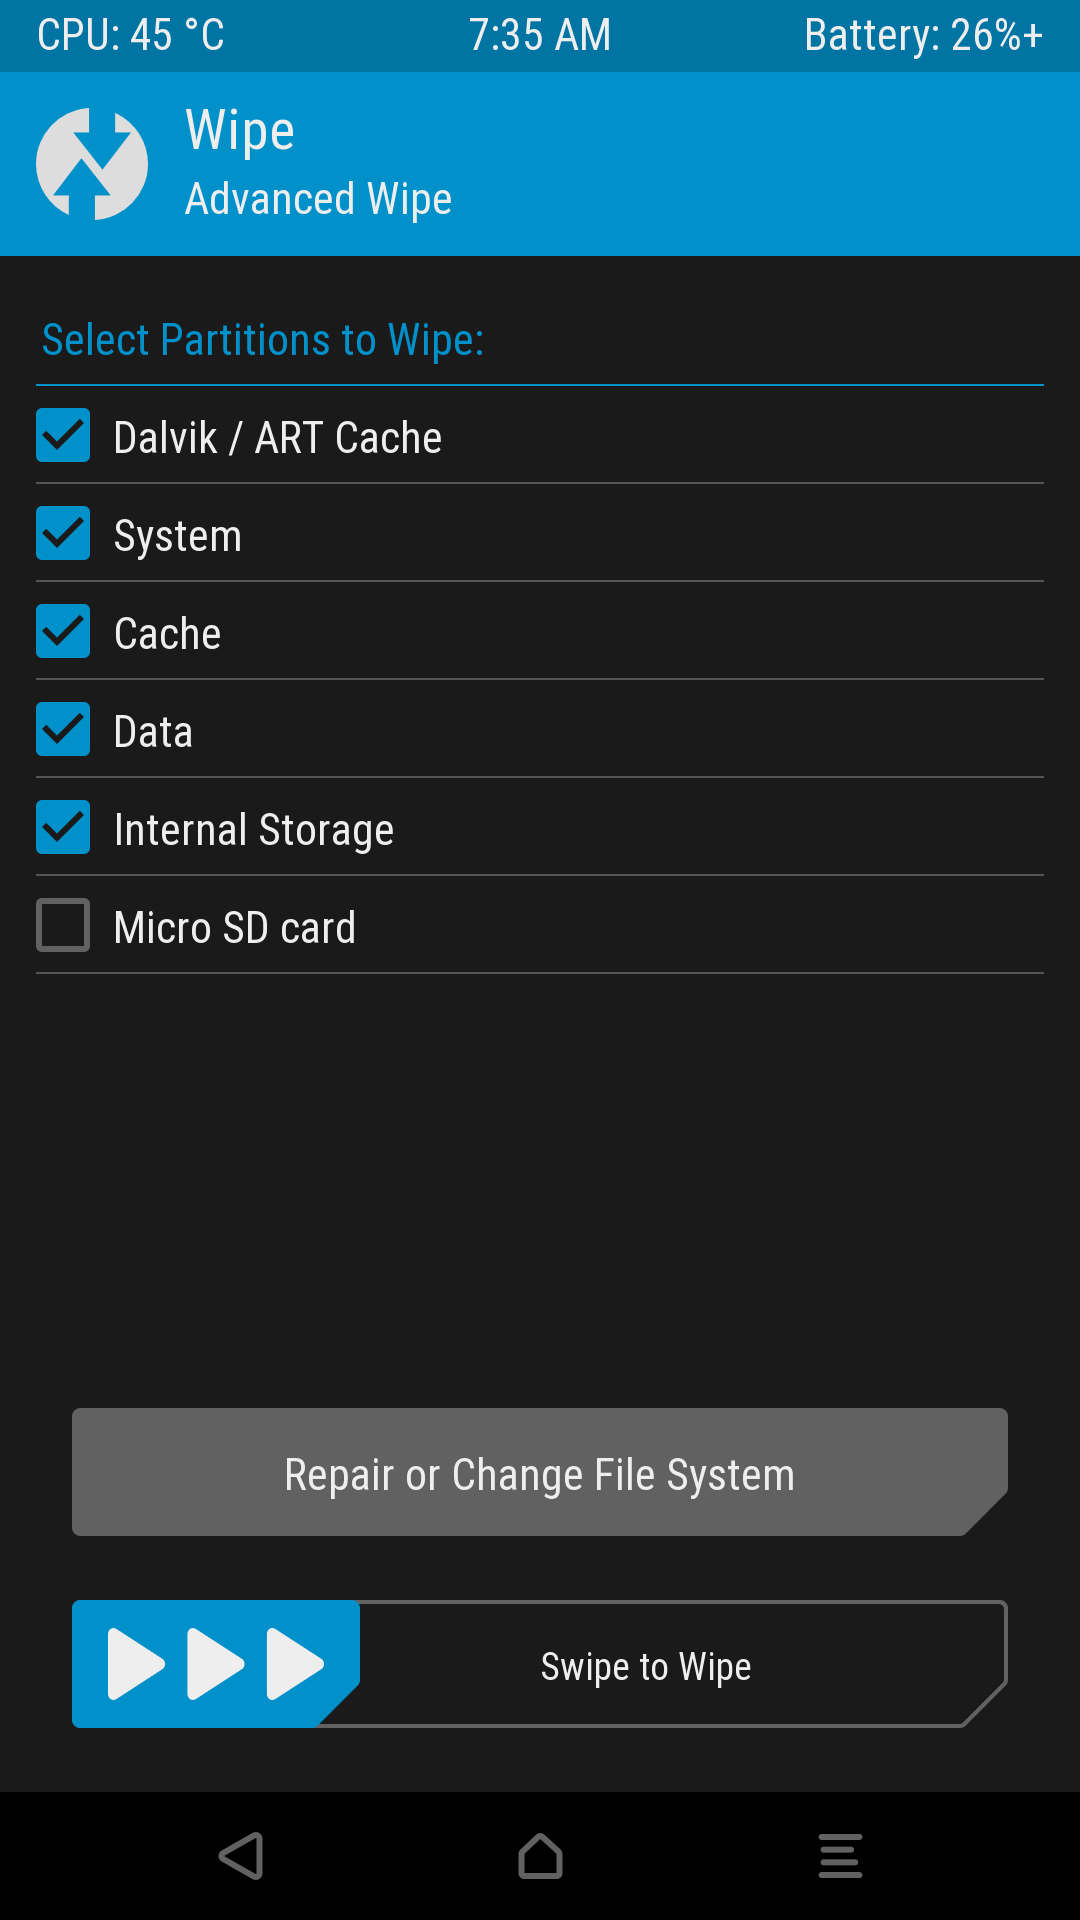
- Enable everything apart from “Micro SD card” / Alles aktivieren außer “Micro SD card”
- Swipe to Wipe
- (wait until “…done”) / (warten bis “…done”)
- Back
- Back to “Wipe” / Zurück zu “Wipe”
- Format Data
- enter yes and confirm / yes eingeben und bestätigen
- (wait until “…done”) / (warten bis “…done”)
- Back
- back to main menu / Zurück ins Hauptmenü
If you really want or need to not only wipe, but format any other partition than Data, which should only very rarely be necessary, then follow the Addendum at the end of this post.
Wenn es gewünscht oder erforderlich sein sollte, eine andere Partition als Data zu formatieren, was nur in sehr seltenen Fällen wirklich notwendig sein sollte, dann siehe dazu den Nachtrag am Ende dieses Posts.
- Reboot

- Bootloader (= fastboot mode / Fastboot-Modus)

- Swipe to Reboot
5. Install Fairphone OS or Fairphone Open OS / Fairphone OS oder Fairphone Open OS installieren
-
Download the current OS for manual installation from here (Fairphone OS) or here (Fairphone Open OS, Attention! the file for “Manual installation” is needed, “OTA” and “Manual switcher” will not work), preferrably into the platform-tools directory from before / Aktuelles OS für manuelle Installation herunterladen von hier (Fairphone OS) oder hier (Fairphone Open OS, Achtung! Richtig ist die Datei für “Manual installation”, falsch sind “OTA” und “Manual switcher”), einfacherweise in das Verzeichnis platform-tools von eben
-
Extract the ZIP archive / ZIP-Archiv entpacken
-
Commence the installation / Installation ausführen
- Windows: flash-for-windows.bat
- Linux: flash-for-unix.sh (perhaps as root or using sudo / evtl. als root oder mit sudo)
- macOS: flash-for-mac.command
Windows for example with the file for Fairphone OS 18.09.2 … / Beispiel Windows mit der Datei für Fairphone OS 18.09.2 …

- Hit a key to reboot and that’s it already. / Taste drücken zum Rebooten und das war’s auch schon.

Addendum - How to format any other partition than Data
Nachtrag - Formatieren einer anderen Partition als Data
It should only very rarely be necessary, but if you really want or need to not only wipe, but format any other partition than Data (for which there’s a convenient button in TWRP), here’s how:
Es sollte nur sehr selten notwendig sein, aber wenn es wirklich gewünscht oder erforderlich sein sollte, eine andere Partition als Data nicht nur zu wipen, sondern zu formatieren (wofür es im Fall von Data einen bequemen Button in TWRP gibt), dann funktioniert das so:

- Wipe

- Advanced Wipe
Here would be the convenient “Format Data” button.
Hier wäre der bequeme Button zum Formatieren von Data.
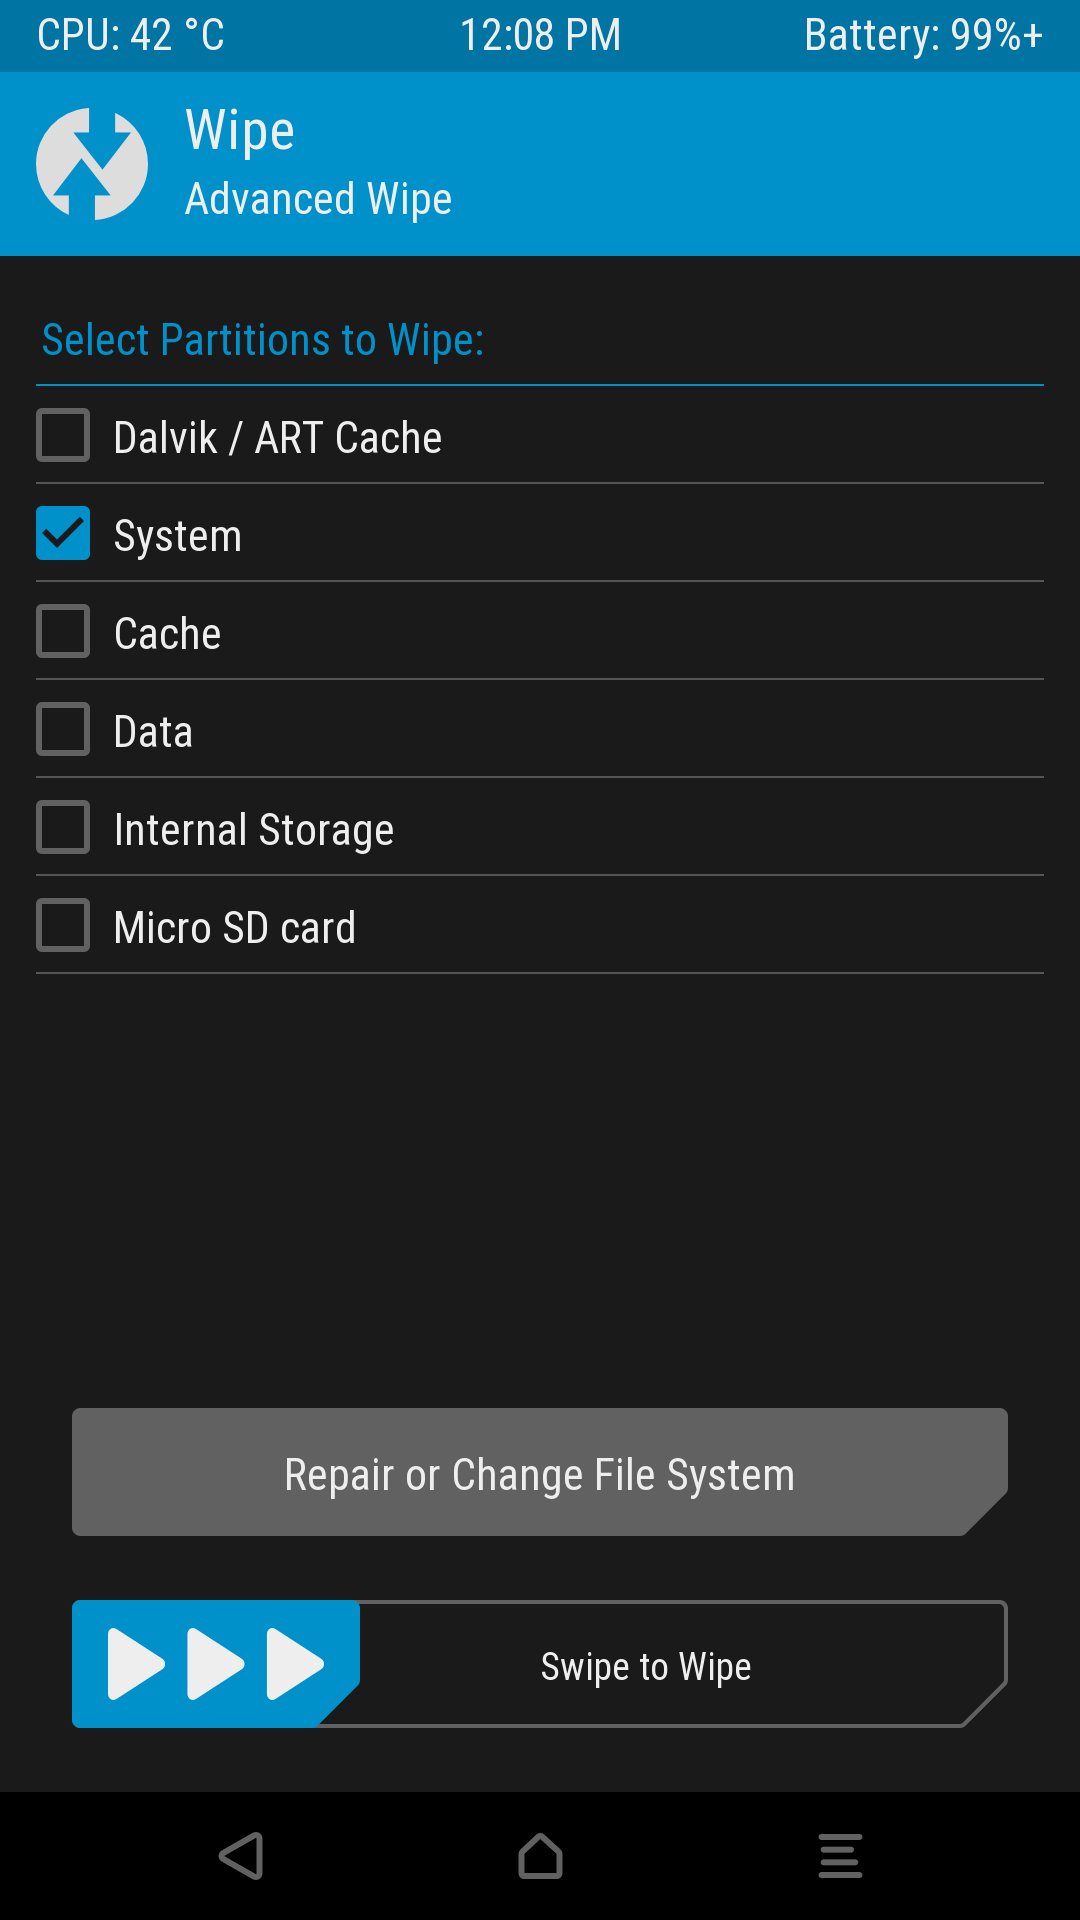
- Select the partition to format (for an example in the screenshot it’s System, but be sure what you want to do)
Keep in mind that Internal Storage is not a partition itself, but just a directory in the Data partition. Formatting Data takes care of Internal Storage, too.
Hier die zu formatierende Partition auswählen (als Beispiel ist im Screenshot System ausgewählt, aber man sollte hier schon wissen, was man tut).
Hinweis: Internal Storage ist eigentlich keine Partition, sondern ein Verzeichnis innerhalb der Data Partition. Wenn Data formatiert wird, ist Internal Storage mit dabei. - Repair or Change File System
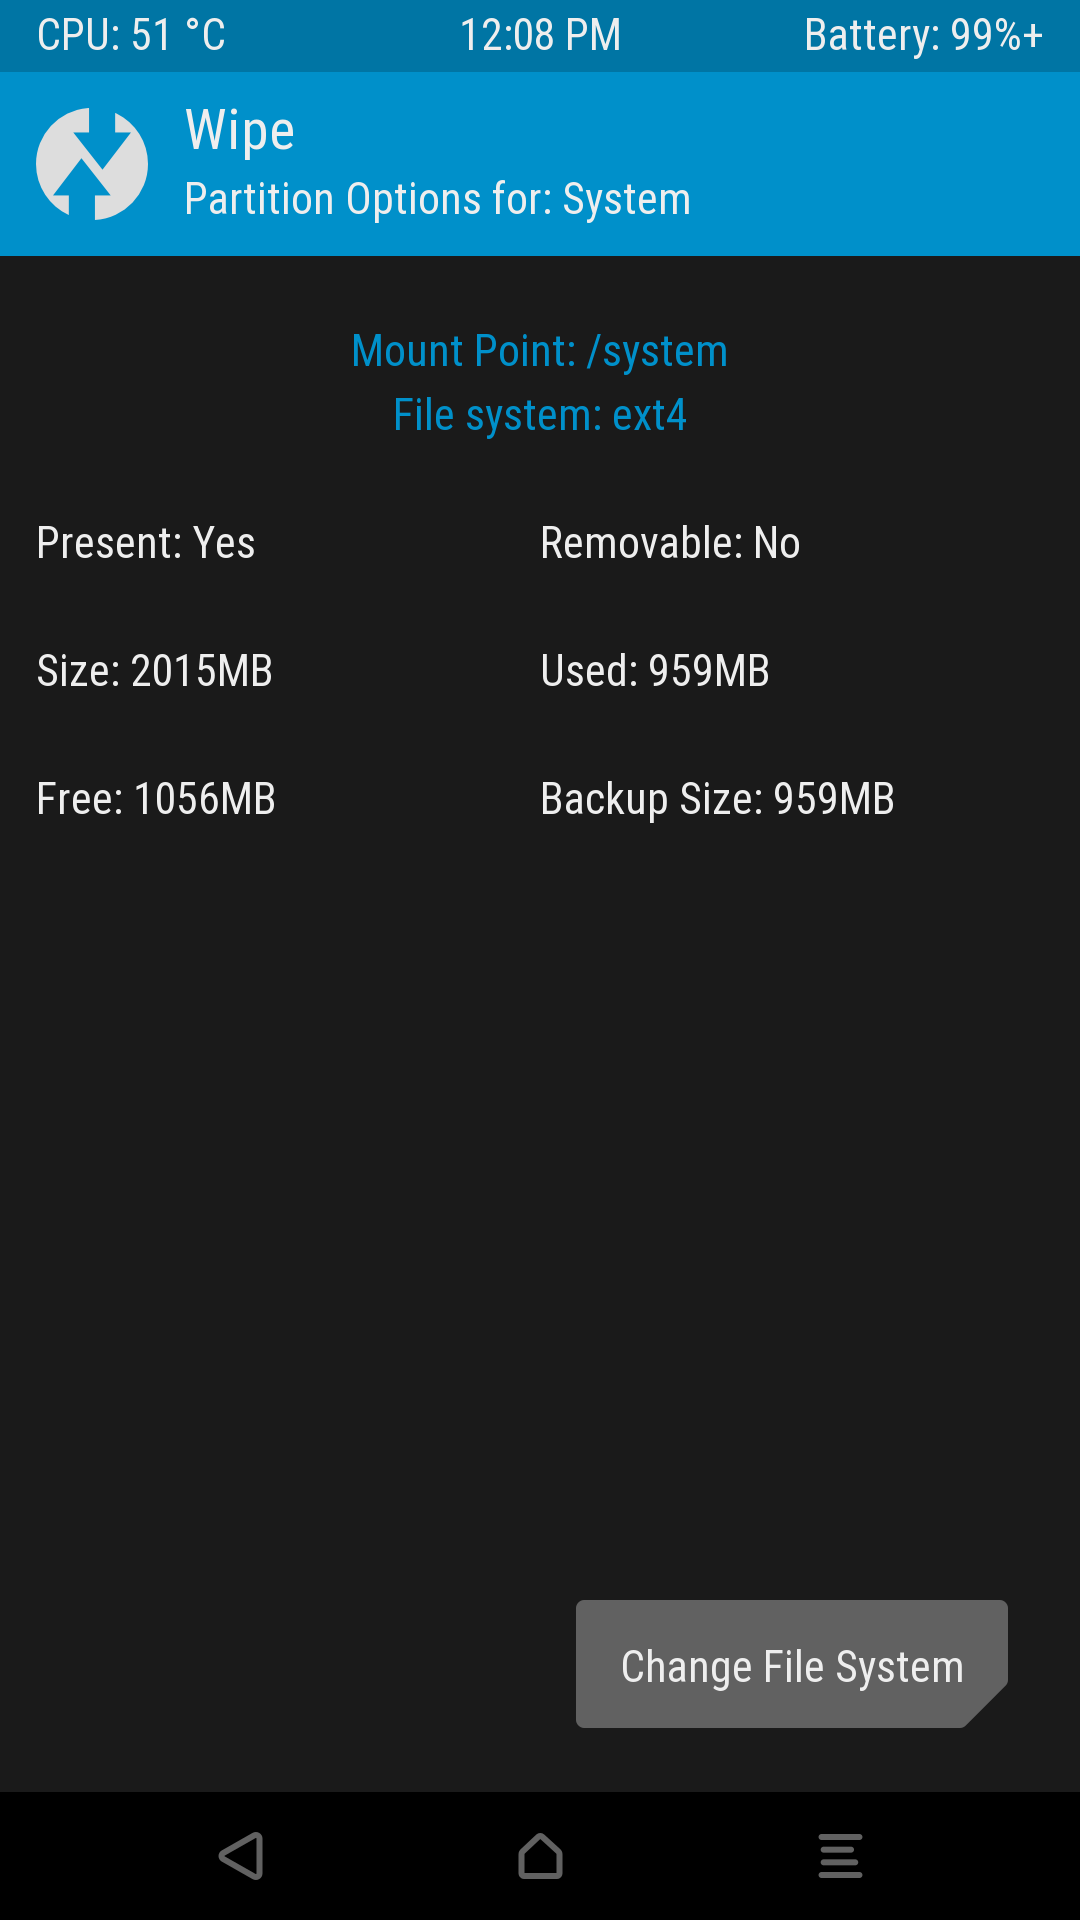
- Change File System
Normally, you wouldn’t want to change the file system, but in TWRP this is the way to go where you want to go right now.
Normalerweise möchte man eigentlich nicht das Dateisystem ändern, aber das ist der Weg, der in TWRP nun gerade zum Ziel führt.

- There are your options for file systems you could now format your selected partition with.
For safety’s sake choose the same file system which is displayed at the top of the screen!
In the screenshot the top of the screen displays “File system: ext4”, so you would want to tap the “EXT4” button at the bottom of the screen.
If you are just experimenting, really heed the warning given in red.
Hier ist die Auswahl der Dateisysteme, mit denen die ausgewählte Partition jetzt formatiert werden kann.
Sicherheitshalber hier bitte dasselbe Dateisystem auswählen, das oben im Bildschirm bereits angezeigt wird!
Im Screenshot wird oben “File system: ext4” angezeigt, also sollte man jetzt den “EXT4” Button unten verwenden.
Wenn nur frei herumexperimentiert wird, dann bitte den in rot angezeigten Hinweis beachten.
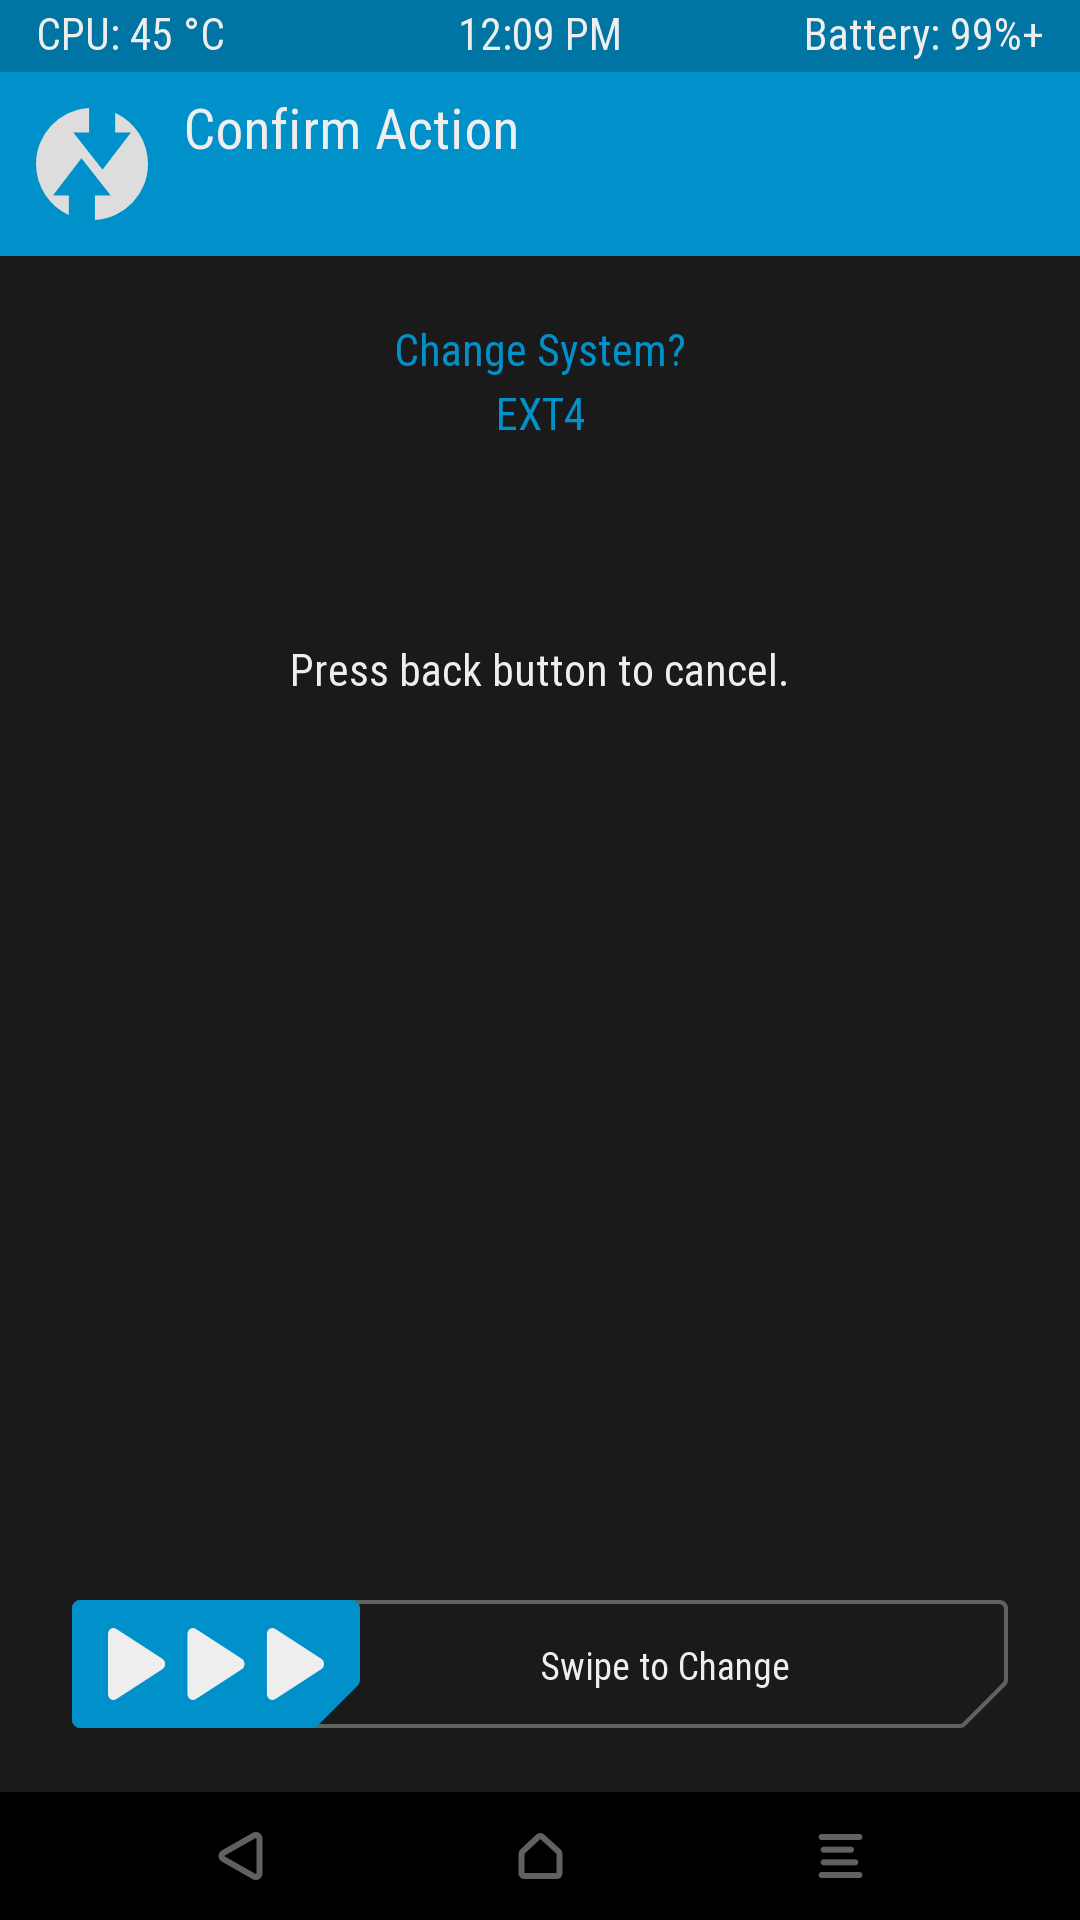
- Swipe to Change
This will format the selected partition.
If you selected the same file system which was already there, of course this formatting will not result in a “change” of the file system, but it will be formatted, there you go. Complain to TWRP .
.
Damit wird die ausgewählte Partition formatiert.
Wenn man dasselbe Dateisystem ausgewählt hat, das vorher schon vorhanden war, dann erfolgt natürlich keine Änderung im Sinne der Bedienelemente an dieser Stelle, aber die Partition wird formatiert, und das war ja der Sinn der Sache. Beschwerden bitte an TWRP .