Reading the wiki post at the top, and other posts on this forum regarding TWRP, I have a few questions. I haven’t read this entire topic, so apologies if they were already answered (but if you answer them anyway, I’ll try to improve the wiki post). Here goes:
Huh? I thought that FP Open OS did not preinstall Google Services? Did I understand this incorrectly? Am I reading this wrong?
Also, it does not make sense to me that a recovery image is installed along with the OS it is protecting. Or is there another layer of protection underneath the recovery?
If FP Open includes TWRP, what version is it? I presume some older version, so you would want to manually install it to get a newer version and/or encryption support?
I see some changes being required to configuration files and Makefiles. Are these changes still needed, or have they been merged in the upstream TWRP sources already?
I see a number of downloads with binary versions of TWRP by various people, but it doesn’t seem clear to me what source files were used for them. Just upstream TWRP sources with FP2 selected as the target, or are there modifications included? In particular the builds with support for encrypted data partitions, is that a feature that got released as part of upstream TWRP, or is that some FP2-specific code that only lives on some developers’ machines? Does the TWRP project perhaps have official builds of their own?
Mind the double negative! Yes, Open OS comes without G%§$e, that’s what the text you quoted says.
The thing is that an OS can’t be modified (including the recovery) to have official G%§$e Support. But since TWRP is far superior FP decided to preinstall it with Open OS, where they don’t have to follow G%§$e’s stupid rules.
I don’t have the version number by hand, but yes it does not have encryption support.
FP Open does not preinstall Google services so either you live without them or flash them afterwards (eg opengapps)
FP Open ships with TWRP as the recovery image by default.
TWRP 2.8.7.0 without /data decryption support.
If you build from the FP Open sources probably yes but that’s not recommended actually because of various reasons.[quote=“matthijs, post:186, topic:12558”]
I see a number of downloads with binary versions of TWRP by various people, but it doesn’t seem clear to me what source files were used for them. Just upstream TWRP sources with FP2 selected as the target, or are there modifications included? In particular the builds with support for encrypted data partitions, is that a feature that got released as part of upstream TWRP, or is that some FP2-specific code that only lives on some developers’ machines? Does the TWRP project perhaps have official builds of their own?
[/quote]
For my downloads (from private.z3ntu.xyz) you can find all important details in the readme.txt file next to the .img files.
Ah, fell for the famous double negative. I went ahead and reworded the phrase to be IMHO more clear.
Ah, that might be something worth mentioning in the wiki post?[quote=“z3ntu, post:188, topic:12558”]
TWRP 2.8.7.0 without /data decryption support.
[/quote]
Thanks, I added that to the wiki post.
Ah, should have looked there, thanks!
Looking at the wiki post again, I think I was slightly confused by all the patches being listed there. Now I understand that those were part of the original posting and process of porting a more recent TWRP version to the fairphone, and it seems that this is mostly historical, and no longer relevant for users wanting to learn about TWRP now. Would it makes sense to move this part (Everything from “Links” up to “Versions”, and probably also including the “first” and “newer” version, but not the latest version by @z3ntu) further down the post (and mark it as historical) so the latest version, flashing howto and upgrade howto are more obvious? This is a big change, so I’m not confident to go ahead and make this change directly.
See for example here or find some more posts on this through the forum search. Basically, since FP2 runs with a Qualcomm Chipset, there are proprietary drivers involved. Those can only be provided by Fairphone as binary blobs (download them here) and not as human-readable code.
The license that comes with the binary blobs (find it here, too) sounds pretty restrictive, so that’s why @Max_S pointed out that the binary blobs aren’t even included in the build.
I read about the binary blobs in the OS, but didn’t see how that related to recovery firmware. Now I realize that (parts of) the same source and tooling were used in the build, so this was just to emphasize that the binary blobs were not included. Thanks for clarifying.
Right, but it seems this post is linked in various places for more info on TWRP, so it does seem to be the defacto resource for people wanting to learn about (installing) TWRP, not just compiling it. So unless someone wants to create another wiki post for that and link to it, it might be best to improve this one?[quote=“z3ntu, post:188, topic:12558”]
I see some changes being required to configuration files and Makefiles. Are these changes still needed, or have they been merged in the upstream TWRP sources already?
If you build from the FP Open sources probably yes but that’s not recommended actually because of various reasons.
[/quote]
Looking at this again, I don’t see the FP2 listed at Devices so that suggests that not all needed modifications are submitted upstream. Is that intentional? Is anything keeping that back? It would (to me) seem better if users can just download the images from the official TWRP pages, rather than from a forum thread here (without intending to undervalue the work done by people building images here, of course).
There’s already a testing build available officially (but not linked on the website) and I just wrote the maintainer an email that he should publish the final build so it should hopefully be available soon. And the (modified) sources (device tree & kernel source) are already on github.com/TeamWin
Well what other payment method do you suggest? I don’t know of any other nice payment methods (except SEPA transfers) except PayPal, Bitcoin (+the million other cryptocurrencies) and Google Wallet
As mentioned, I think the wiki post should be restructured to serve as reference documentation. I’ve put a proposal for this below, unless anyone objects (@Max_S or @z3ntu in particular), I’ll go ahead and apply this proposal.
I moved the historical porting notes down, and marked them as such.
I rewrote the top of the post, to help new users find out what TWRP is and how things work.
I rewrote the upgrading instructions a bit, so they should apply for FP Open OS too.
This is a wiki post. Everyone can improve it, by clicking the green pencil above. The original post was about porting TWRP to the Fairphone and is preserved at the end of this post for historical purposes.
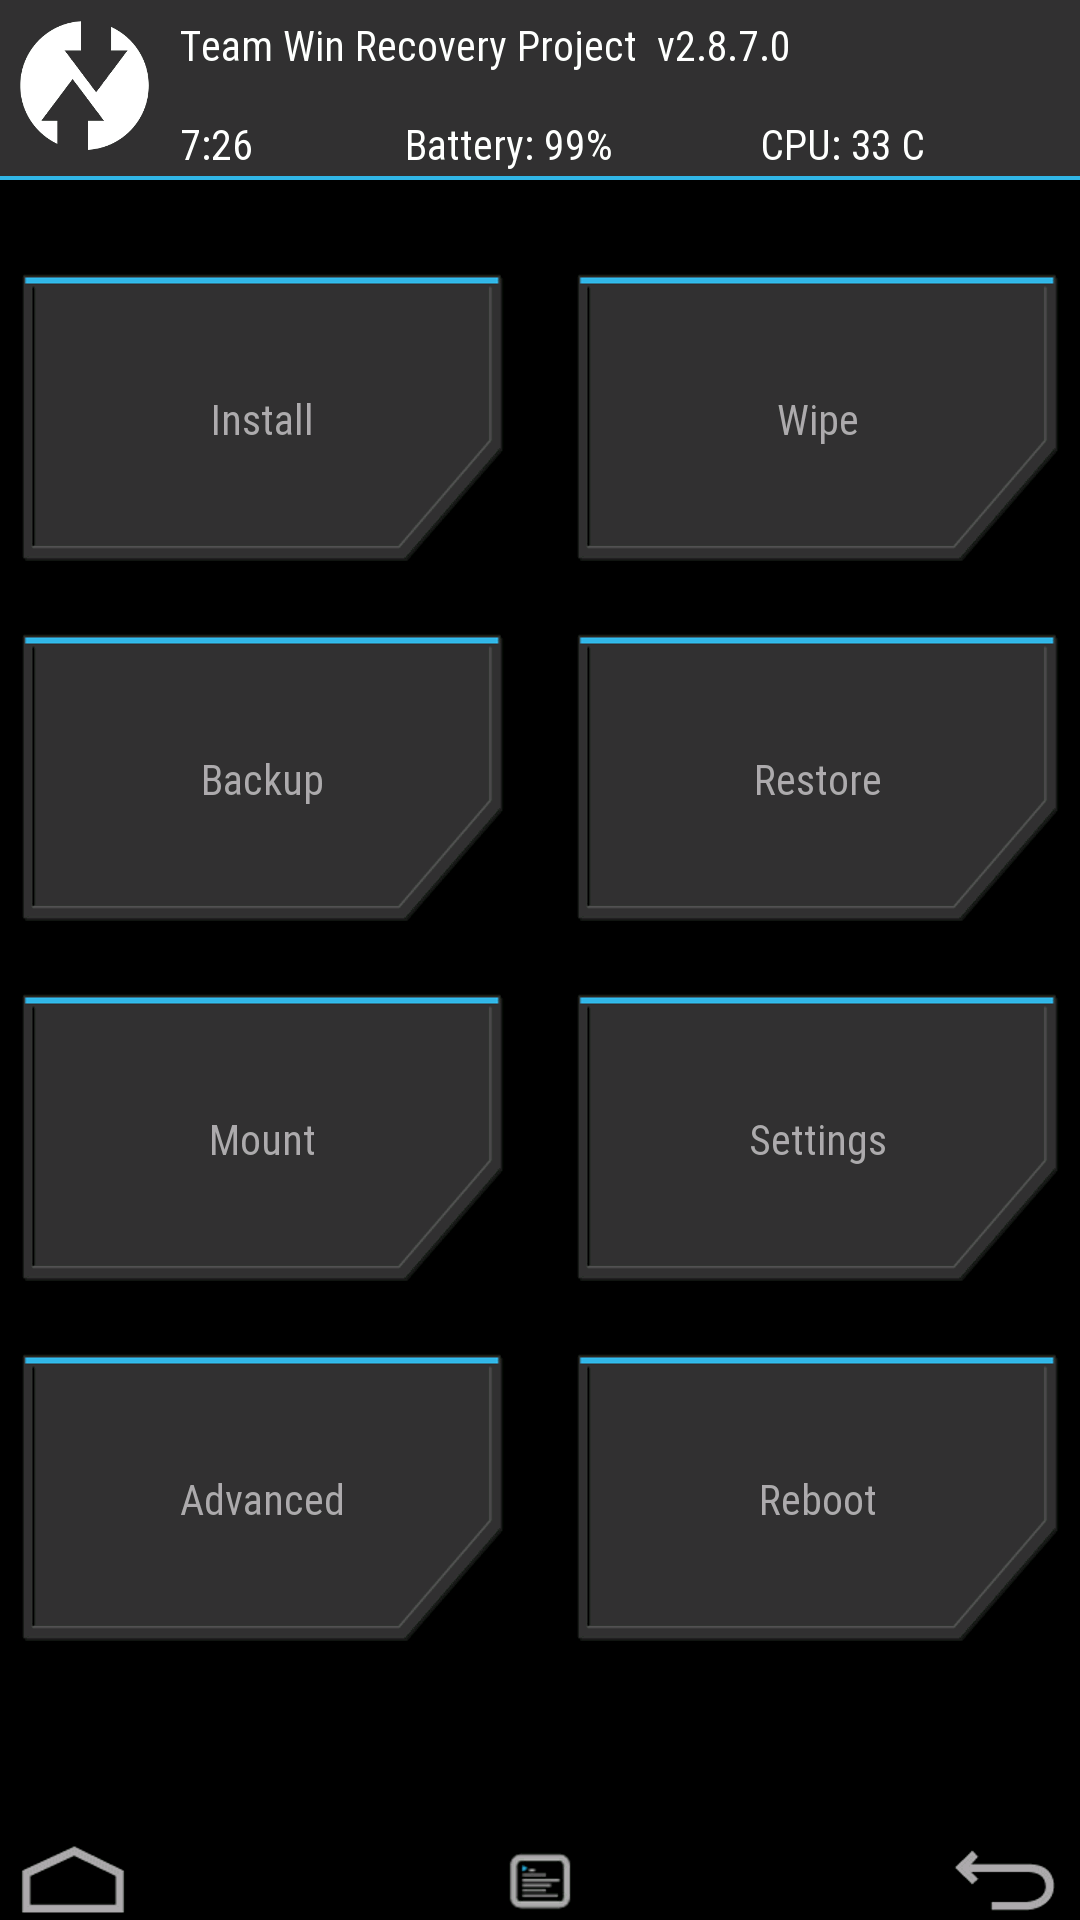
TWRP is a recovery image, that provides a better user interface and additional features over the stock recovery image.
You can use the recovery image to replace the OS on your phone if it somehow gets broken, manually install updates or system apps (sideloading), apply a factor reset, etc. If you somehow mess up the recovery image itself, you can still use fastboot mode (as described below) to reinstall the recovery image or the OS itself.
This post is about the Fairphone 2, for info on TWRP on the FP1, see this post.
If you install FP Open OS (note that the Open OS does not include any Google-applications and services), you get an older version (2.8.7.0) of TWRP already, which might be sufficient. This version does not support an encrypted data partition. See below on how to use this older TWRP version to install a newer version (if desired).
Updating your FP (Open) OS using the OTA upgrader application will overwrite the recovery image as well. See below for how to prevent this.
Getting TWRP
Since April 2017, support for the FP2 was integrated into TWRP and official precompiled versions are available from their website. Before that, custom images were offered in this forum thread, which should not longer be needed now.
To download a TWRP image file, head over to the TWRP website and look up the FP2 in their device list (direct link). You can find the images under “Download links”.
All versions available from the TWRP website support an encrypted data partition.
Upgrading TWRP using TWRP
Once you have TWRP installed (for example by installing FP Open OS) you can use it to update itself to a newer version. Doing so is fairly straightforward, but here’s a breakdown just in case:
Put the TWRP .img file you want to install on the internal storage or SD card.
Start TWRP by keeping volume up and power pressed for 10s or so during power on. If you boot it for the first time, it asks to enable write permission for the system partition, which is not needed for updating TWRP.
Select Install
Touch Install Image (or Images... in older versions) in the lower right to allow selecting images files instead of zip files.
Find the .img file you want to install and touch it.
Select the Recovery partition
Swipe to confirm the flash
Installing or upgrading TWRP using adb and fastboot
Fastboot mode should always be available, regardless of what OS or recovery image is currently installed.
We are following similar procedure as for rooting, for which you have to install all software and drivers stated there under step 3a-c and continue as follows:
1. First of all to make things easy, download the pre-compiled TWRP recovery.img (see above under Versions and copy it directly to your
C:\ drive (C:\recovery.img)
2. Start up your minimal ADB and Fastboot by double clicking the
shortcut on your desktop/program folder. A command promt will appear. Your FP2 should be switched on and connected via USB.
3. First we will start the FP2 into Fastboot mode by entering:
adb reboot bootloader
Your phone should reboot but instead of starting normally it will just display the black Fairphone logo.
If you have errors: see here or here
4. Make sure, you still have connection to the phone by entering:
fastboot devices
This should output something like: f8b4f663 fastboot
If you have errors: see here or here. If your phone displays a prompt to authorize your PC to connect via ADB, allow it.
5. Next we will flash the image to the FP2 by typing:
fastboot flash recovery c:\recovery.img
The flashing only takes some seconds and should not produce any errors.
6. At last we will restart our FP2 by typing:
fastboot reboot
Your phone should start normally and flashing is complete.
6.b Verify that TWRP was permanently installed:
Sometimes, when booting into the Android system normally right after flashing the TWRP recovery image, the system restores the previous default recovery image. Verify which recovery is active:
Switch off your FP2
Boot into recovery mode (by pressing VOLUME UP and ON in parallel until you see the recovery screen, this takes about ~10 seconds)
If you see the TWRP logo followed by a “graphical” user interface, everything worked fine.
If, on the other hand, you see a miniature text-based interface, saying something like “Android system recovery…” in the first line, you need to flash TWRP again and boot into recovery mode as the very first step right after flashing the image (instead of booting into Android system normally):
Flash the TWPR image again as described above
type fastboot reboot → but do not press ENTER yet!
press the VOLUME UP button on your FP2 (and keep it pressed)
hit ENTER key to execute reboot and take you directly into the TWRP recovery
After this, TWRP should be flashed permamantly.
7. If you want to continue to install XPosed Framework + GravityBox:
install XPosed Framework:
Switch off your FP2
boot into TWRP recovery (by pressing VOLUME UP and ON in parallel until you see the TWRP screen, this takes about ~10 seconds)
install the downloaded XPosed ZIP (the current is xposed-v86-sdk22-arm.zip)
To manage the modules you still need to install the “XPosed Installer” from the XDA-site (current version is XposedInstaller_3.0_alpha4.apk) (*)
You have to enable the XPosed Framework and restart your phone
After one of the reboots your Android maybe will show “Optimizing Apps # from #”.
If you want to install GravityBox, download the module within the XPosedInstaller and be happy to tweak your FP2
(*) In case this does not work for you out of the box, you may need to rename /system/vendor/lib/libart.so (and perhaps /system/vendor/lib/libart-compiler.so as well), e.g. by appending .bak to the file(s) (/system/vendor/lib/libart.so.bak). At least, this did the trick for me on a rooted FP Open OS.
Afterwards, I tried to install the XposedInstaller, Amaze told me it did not work, but on rebooting I saw the optimising apps message. I then "re"installed the XposedInstaller after the reboot and this worked.
But as @fp1_wo_sw_updates rightfully put it:
It looks like proprietary libs from qualcomm are in the way. On rooted phones running the google-free FP Open OS, people seem to have success by renaming /system/vendor/lib/libart.so and /system/vendor/lib/libart-compiler.so so the system uses the libs installed by the xposed installer. (This is just a guess, please [read the corresponding posts]! Don’t brick your phone! Also this will remove the optimized QC libs from the running system).
Updating Fairphone (Open) OS without overwriting TWRP
If you update FP (Open) OS using the builtin updater, or flash.bat or flash.sh script, it will overwrite the recovery image with an older version of TWRP. To prevent that, use TWRP to apply the update instead:
Download the “Manual installation” zipfile version (for FP OS, the link is in this support article, for FP Open OS, the link is on the releases page), save it on SD card or internal storage
Start phone in TWRP (Power+VolUp > 10s) and install the image via ZIP
If desired, without reboot also (re-)flash XPosed ZIP with TWRP (details)
Then reboot into fastboot mode (by choosing “Restart” and “bootloader” in TWRP
Reboot (fastboot reboot) and let your phone “optimize apps” (since this takes quite a while)
Procedure tested for:
FP2 v1.? (original) → 1.2.8 (April 2016) having TWRP and root access via superuser before
###History
2016-01-20:
Fixed color of gui (orange → blue).
Removed note regarding Xposed (here for this topic).
Added screenshot.
Added list of tested things.
2016-01-22:
Updated list of tested things
2016-01-25:
Added known issue.
2016-02-13
Updated the installation guide for the compiled recovery.img (@therob)
2016-03-03
Updated the installation guide for the compiled recovery.img by adding a side note on the installation of the XposedInstaller on rooted FP Open OS. (@merci)
2016-04-10
Added procedure to install FPOS updates, when TWRP is installed (@therob)
2016-12-xx
Added description on (sometimes) necessary steps to have TWRP be installed permanently
2017-03-04
Manual system updates: add link to Fairphone’s official support article for latest FPOS images
Installation guide: Short hint for flashing images direct from TWRP
Known Issues: Delete data encryption issue
2017-04-03
Restructure post to serve as a reference and move historical porting information down.
Original post about porting TWRP below
Today I started looking into TWRP recovery and made good progress. I want to share my experience, patches etc. here with you. Maybe there are some interested people (I know there are ) who wants to collaborate, test, give hints etc.
##links
So lets start with the links to get good information from:
###Adding repositories
Okay, so here we go. When going to the Howto on XDA-Developer, we need to replace bootable/recovery. So I added a .repo/local_manifests/local_manifest.xml file:
As you can see here. Busybox will also be required. You may than remove the old bootable/recovery first to get it synced. Repo will show you the message.
###Device configuration
Next I edited device/fairphone_devices/FP2/BoardConfig.mk and added these options at the end:
I just copied the settings from the Sony device and went through the descriptions in the guide. These were the only ones that made sense to me for a first try
TW_TARGET_USES_QCOM_BSP is required to get the blue colors (instead of orange).
Next thing is the fstab. I added device/fairphone_devices/FP2/twrp.fstab with this:
If recovery output is removed before creating it, busybox, recovery etc is removed again. So I removed this line. This isn’t also available in omnirom repository.
The seconds change is a dirty hack. I don’t know how to copy the twrp.fstab in the best way. I’ve tried with PRODUCT_COPY_FILES in FP2.mk, but didn’t work. Maybe someone can find that out.
###selinux
Of course there are also some SELinux issues (would be boring otherwise ). I could fix one with this modification:
project bootable/recovery/
diff --git a/etc/init.rc b/etc/init.rc
index 4e7b845..cfb3c39 100644
--- a/etc/init.rc
+++ b/etc/init.rc
@@ -88,6 +88,7 @@ service healthd /sbin/healthd -r
     seclabel u:r:healthd:s0

 service recovery /sbin/recovery
+    seclabel u:r:recovery:s0

 service adbd /sbin/adbd --root_seclabel=u:r:su:s0 --device_banner=recovery
     disabled
####Policies
Omnirom doesn’t have this, but I needed it to get a first working version.
I also made these changes, but I’m not sure if they’re really required:
project external/sepolicy/
diff --git a/recovery.te b/recovery.te
index 821da01..89d7d98 100644
--- a/recovery.te
+++ b/recovery.te
@@ -7,7 +7,10 @@ type recovery, domain;
 # But the allow rules are only included in the recovery policy.
 # Otherwise recovery is only allowed the domain rules.
 recovery_only(`
-  allow recovery self:capability { chown dac_override fowner fsetid setfcap setuid setgid sys_admin sys_tty_config };
+  # Allow recovery to set permissive mode
+  permissive recovery;
+
+  allow recovery self:capability { chown dac_override fowner fsetid setfcap setuid setgid sys_admin sys_tty_config sys_time };

   # Set security contexts on files that are not known to the loaded policy.
   allow recovery self:capability2 mac_admin;
@@ -22,6 +25,10 @@ recovery_only(`
   allow recovery unlabeled:filesystem ~relabelto;
   allow recovery contextmount_type:filesystem relabelto;

+  allow recovery selinuxfs:file rw_file_perms;
+  allow recovery rootfs:dir { add_name write remove_name };
+  allow recovery rootfs:{file lnk_file} { create_file_perms relabelfrom relabelto };
+
   # Create and relabel files and directories under /system.
   allow recovery exec_type:{ file lnk_file } { create_file_perms relabelfrom relabelto };
   allow recovery system_file:{ file lnk_file } { create_file_perms relabelfrom relabelto };

diff --git a/service_contexts b/service_contexts
index 8fe6972..05f5460 100644
--- a/service_contexts
+++ b/service_contexts
@@ -88,6 +88,7 @@ procstats                                 u:object_r:system_server_service:s0
 radio.phonesubinfo                        u:object_r:radio_service:s0
 radio.phone                               u:object_r:radio_service:s0
 radio.sms                                 u:object_r:radio_service:s0
+recovery                                  u:object_r:system_server_service:s0
 restrictions                              u:object_r:system_server_service:s0
 rttmanager                                u:object_r:system_server_service:s0
 samplingprofiler                          u:object_r:system_server_service:s0
Adding sys_time to capability made the clock working in emulator. Unfortunately not on device.
to the kernel config in kernel/arch/arm/configs/fairphone_defconfig to reduce size of the image. So we have a little space left, just in case.
I made the change with
make kernelconfig
what reorders config file a little bit.
###Building
You can then run
make -j8 recoveryimage
Clean before and don’t apply the binary blobs. It should build without it. Furthermore with binary blobs my recovery.img was too big for flashing. And also we don’t want this here if possible. So maybe it can be distributed in future.
##testing
For testing I added a virtual device based on Nexus 5 in the emulator. Then I started it with the ramdisk-recovery.img:
I’m not sure yet if they need to be solved. Maybe someone can look at them.
When it started in emulator, I flashed it to my phone. It booted up and looked good so far. I also was able to flash a zip file.
Beside from further testing, there are still some things which need to be resolved. E.g. clock shows wrong time (due to wrong timezone setting). Would be great if someone could help me to solve this
* Encrypted userdata (/data) can’t be accessed. This is most likely because of some vendor/hardware specific crypto features. Need to try this.
###Versions This is an experimental version. It runs on my phone and I did first tests, but nothing more. There are things which are not working yet and I can’t promise that it will not break anything.
Here is a first version for testing. And Here is the newest version (please update if newer version available). It can be flashed as usual with fastboot (see below for the installation guide):
Checksums of recovery.img (first version):
MD5: e6f229d4324fcdaaa79c2d325adbf59a
SHA256: 3032ea733319997a72ab521a11225783ffca5fd1d137e49d297a8b183a89544f
Checksum of recovery.img (newer version from @OuinOuin’s post):
MD5: 8a634c3be94136d6c4abb859057599c7
As I didn’t apply the binary blobs, there shouldn’t be any legal issues with that. If Fairphone has another opinion about that, I will remove the file immediately.
Hm, I just copied that part from the original post. Still, I tried the fastboot flow for a bit and filled in the missing bit
I also tested updating TWRP using TWRP (starting from the FP Open OS version) and slightly tweaked those instructions, so it should be finished AFAICS now.
Can somebody who is good at editing the first post, replace the TWRP download from my site (private.z3ntu.xyz) with the official download link and integrate that stuff somehow? https://twrp.me/fairphone/fairphone2.html
I rather wonder if we should have an own topic for this purpose.
In my opinion, this topic is related on how to port TWRP. I would suggest you open a new topic that the FP2 port has become an official TWRP port. I think this could separate the porting discussions from the various issues that could be related to the official port.
I went ahead and took my proposal from post #199 and created a new topic from that: ✏ Using TWRP on the Fairphone 2 I was originally planning to put it in the first post here, but a separate topic is probably a better idea. It still needs a forum moderator to mark it as a wiki, though.
I also put a notice in the first post of this topic, pointing to the new topic.
The formatting of the new topic might be a bit broken in places, it took me a bit of effort to get to the original markdown source of my proposal, since I can’t edit the post anymore.
I have successfully tested backing up my encrypted userdata partition. Restore not yet tested.
What happens, when I restore? Is userdata still encrypted?
That is still unclear to me.