Dear remaining Fairphone 1 users,
this guide is for everyone who is trying to use the fairphone 1 till the bitter end, even with a defect power button.
As I really like the size of the phone and there is no comparable phone on the market (with the FP3 being quiet large), I’m still waiting for a good alternative. While I wouldn’t mind using it for some more years, the 3G network is sunset soon in many countries. Therefore, the following seven months are the ultimate final countdown for (german) FP1 Users.
Nevertheless, here is my guide on how to reinstall Fairphone OS and remap the power button functionality to one of the volume keys.
Manually Reinstall Fairphone OS
-
Take a look at the official guide:
https://support.fairphone.com/hc/en-us/articles/202478028-Manually-install-Fairphone-OS-on-your-Fairphone-1
Our problem is the step that says: “A resting Android robot lying on the back will appear after a few seconds. Press the power button to enter the System Recovery” -
Access the motherboard
As our power button is not working, we need to find another way to press the button without actually pressing it. To be able to follow the guide we have to manually evoke a short circuit. That’s what the power button usually does. Therefore, we have to remove the defect power button from the motherboard. Go over to iFixit and follow the take apart guide for the motherboard:
Fairphone 1 Motherboard ersetzen - iFixit Reparaturanleitung -
Remove the defect power button
Once you freed the motherboard from the casing, remove the defect power button component (circled in red) by carfeully pulling on it with your fingers. It should come off quiet easily. Be sure it’s really broken before you remove it! And be careful to not create further damage! Of course, you can try to get a new button from ebay and attach it with a soldering iron, as described in another guide on this forum. I didn’t dare to try it without having a backup phone. Neither did my local repair shop.
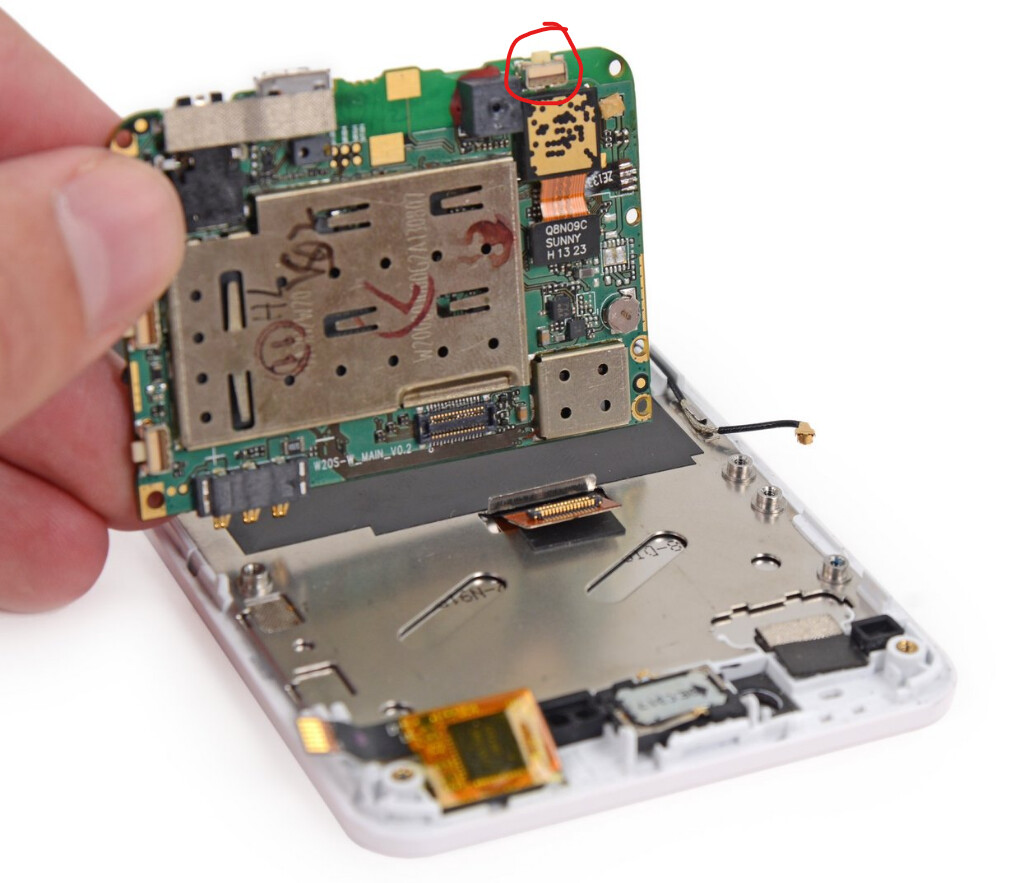
image source (edited): iFixit
-
Reassemble and startup the phone
After removing the power button component, we should be able to see the tiny bare contacts from the motherboard. Put everything back together and connect the phone to your computer. Start the PLUGGED IN phone by inserting the battery and pressing the volume up button at the same time. -
Follow the official guide
The boot menu should come up after a while. It lets you choose between different options. With the “Volume Down” button, choose “Recovery Mode”. Confirm with “Volume Up”. Now, the laying robot should show up, as written in the official tutorial (linked in step 1). Get a paper clip or something else made of conductive metal and fiddle around in the hole of the missing power button. Sooner or later you should be able to hit the right spots on the motherboard and the fairphone will recognise your fiddling as a power button press. The menu should open as written in the guide and you can continue to follow the guide. Instead of selecting “apply update from scard”, which requires you to save the .zip file to the internal storage first, you can select “apply update from adb” and simply install the .zip file by using adb sideload (see part 2 for the usage of adb). In this case you won’t need to save the .zip to your sd card. After installation, you can factory reset your phone by selecting “wipe data/factory reset”. Last but not least you should “wipe cache”. -
Keep your phone awake for now
Once you rebooted your device, keep the phone awake till you completed the remapping with the next part of this guide or you will have to fiddle around with the paper clip again.
Remap Power Button To Volume Button
-
Download and install plattform tools and android usb driver from google
-
Enable debugging on your fairphone (under developer options)
-
Open cmd and change directory of commandline tool to your adb folder
cd [path](where [path] is the path of the extracted platform tools)
-
Check if adb can find your phone
adb devices -
Copy the keylayout files from your phone to your computer
adb pull /system/usr/keylayout/ -
Open the file “mtk-kpd.kl” on your computer (with e.g. notepad++) and edit the line:
key 115 VOLUME_UP WAKE_DROPPED
to
key 115 POWER WAKE
-
Save the changes and copy the file back to your fairphone
adb push keylayout/mtk-kpd.kl /storage/sdcard0/download/(this step is a workaround, as we have no write access to the phone’s “system” folder)
-
Copy the modifided file from “download” to “system” folder with the following commands
adb shell
su
mount -o rw,remount /system
cp /storage/sdcard0/download/mtk-kpd.kl /system/usr/keylayout
exit
exit
adb rebootYour fairphone reboots and you should now be able to use the “volume up” button to wake up your phone or to lock the screen. To power it up, you still have to use the described method of putting in the battery and pressing the volume up button while the phone is connected, as the remapping is just a software-workaround that only works once the phone has started.
-
Bugfix for phone not waking up occasionally
There is an issue where the phone sometimes does not wake up on the first press of the volume button. It’s not just a delay, you sometimes need to press the button multiple times till the phone reacts. To fix this, we need the help of an app. Download “Power Button to Volume Button” by TeliApp and enable all settings. If you only use this app without manually remapping the key, the phone will sometimes not wake up either. So you have to apply both fixes to make it work fluently. The biggest compromise will be the battery drain due to the continous background process of the app.
Maybe there is someone who knows how to accomplish a fully working remapping without the help of an additional app?
Feel free to leave feedback!